참고 - IF(kakao) 2022
🤔 Warm Up이 필요한 주요 이유 Spring Boot 와 같은 JAVA 애플리케이션을 최초 실행하거나 재배포할 때, 첫 번째 요청이 다른 요청들에 비해 현저히 느린 현상을 경험한 적이 있을 것입니다. 이러한 현상을 Cold Start 문제라고 하며, 이를 해결하기 위해 Warm Up이 필요합니다.
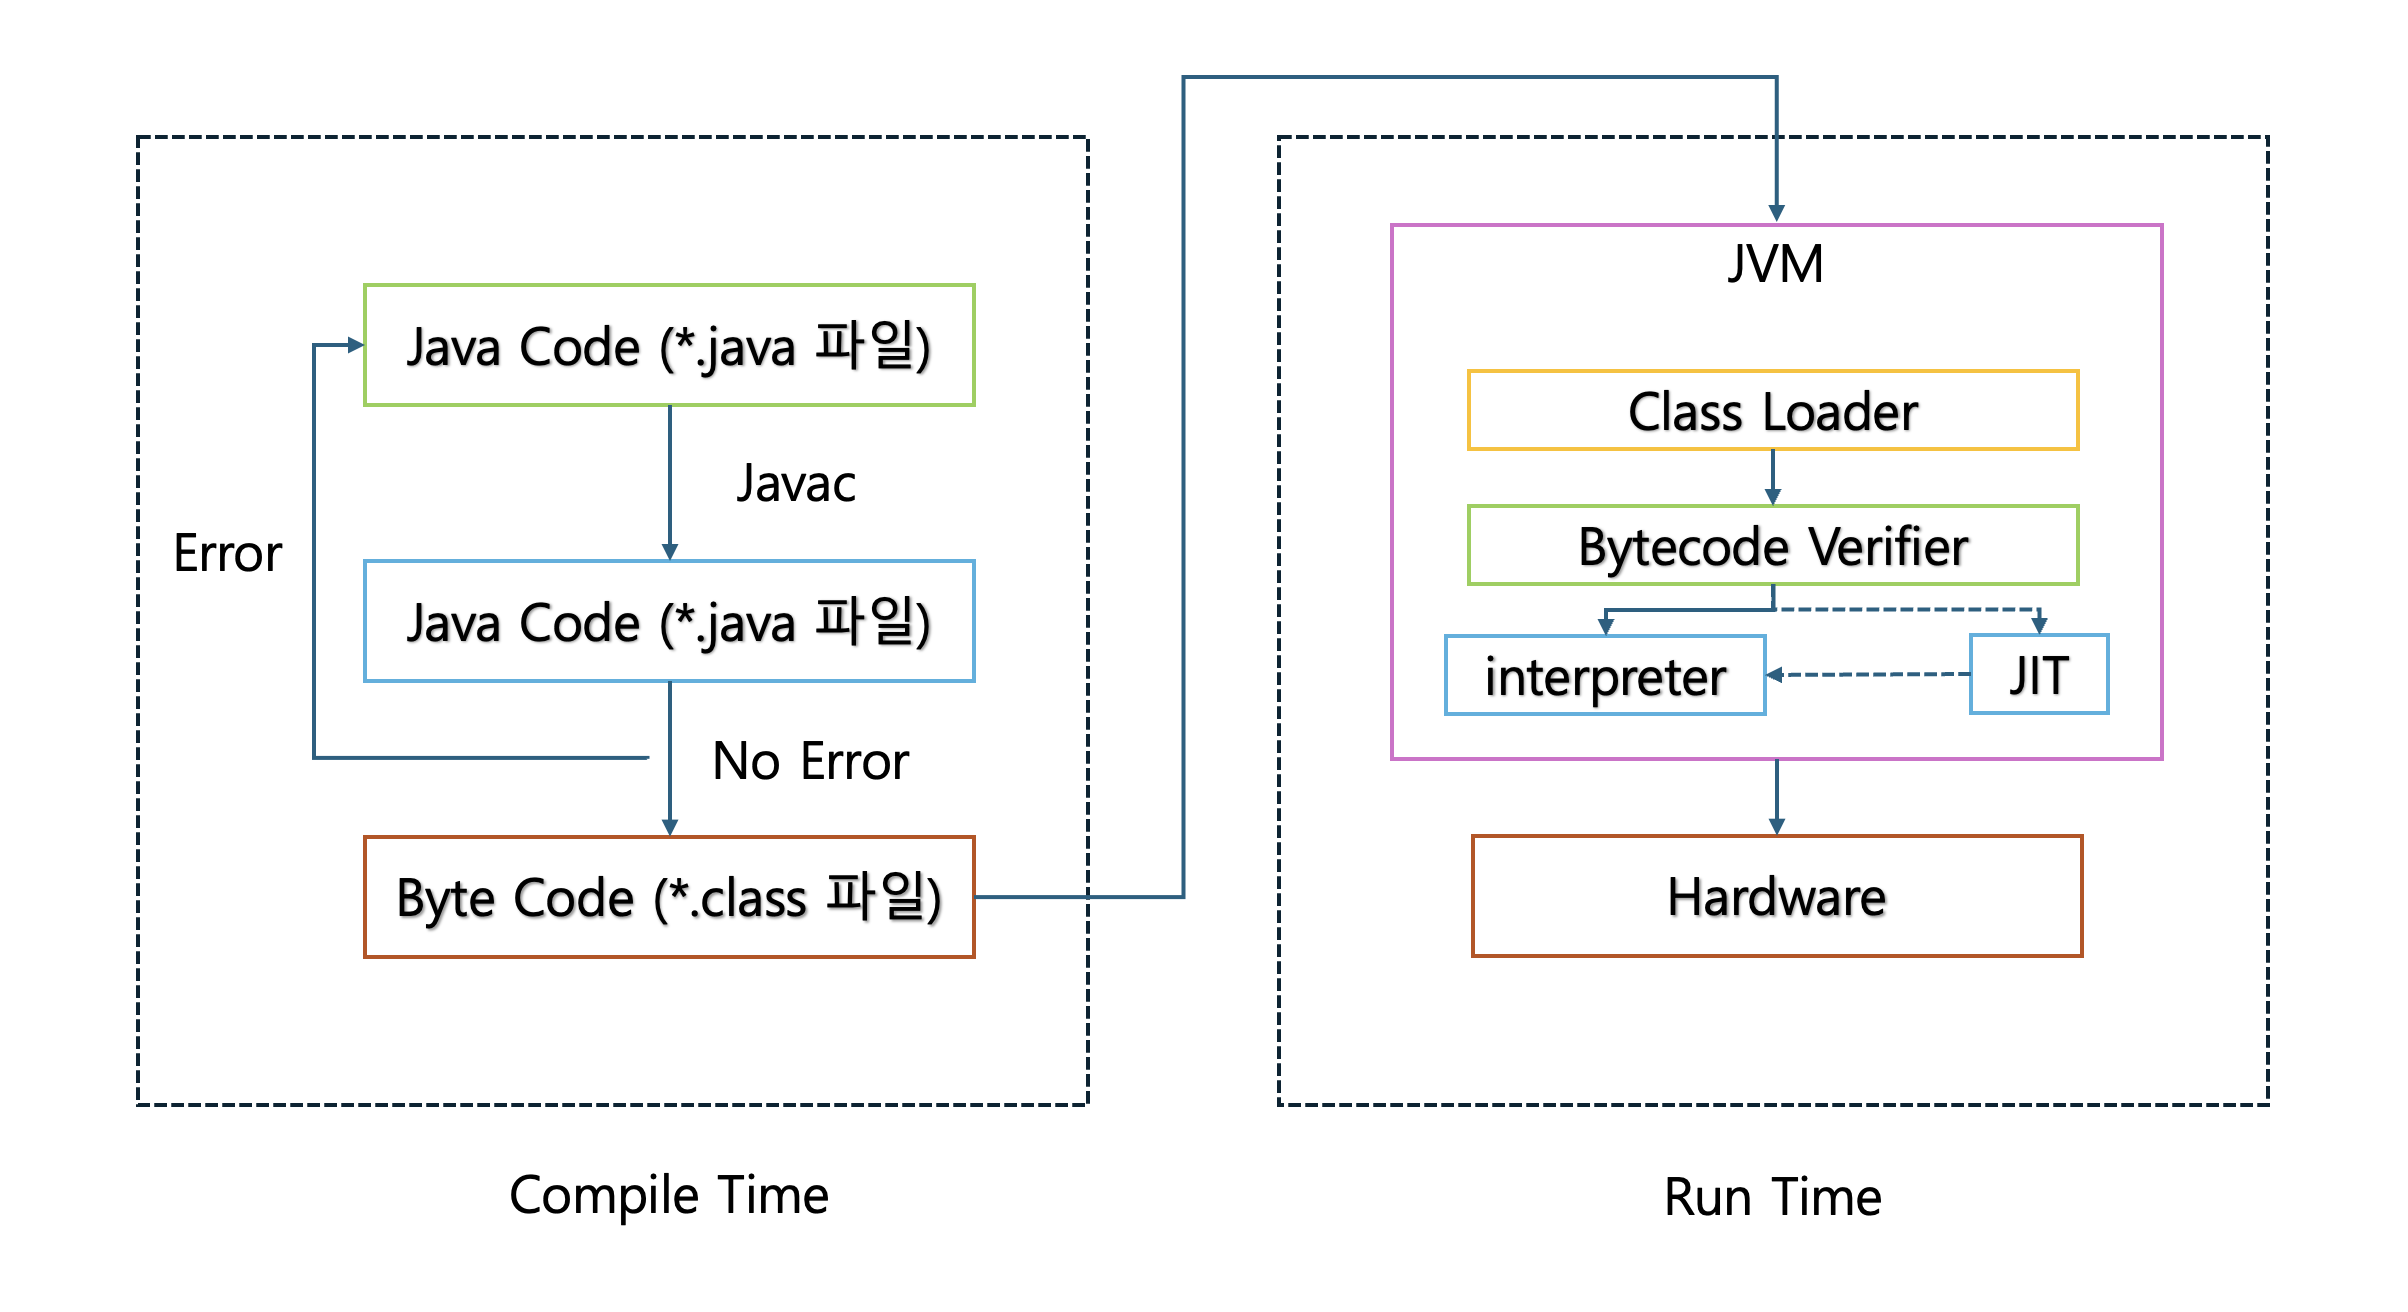
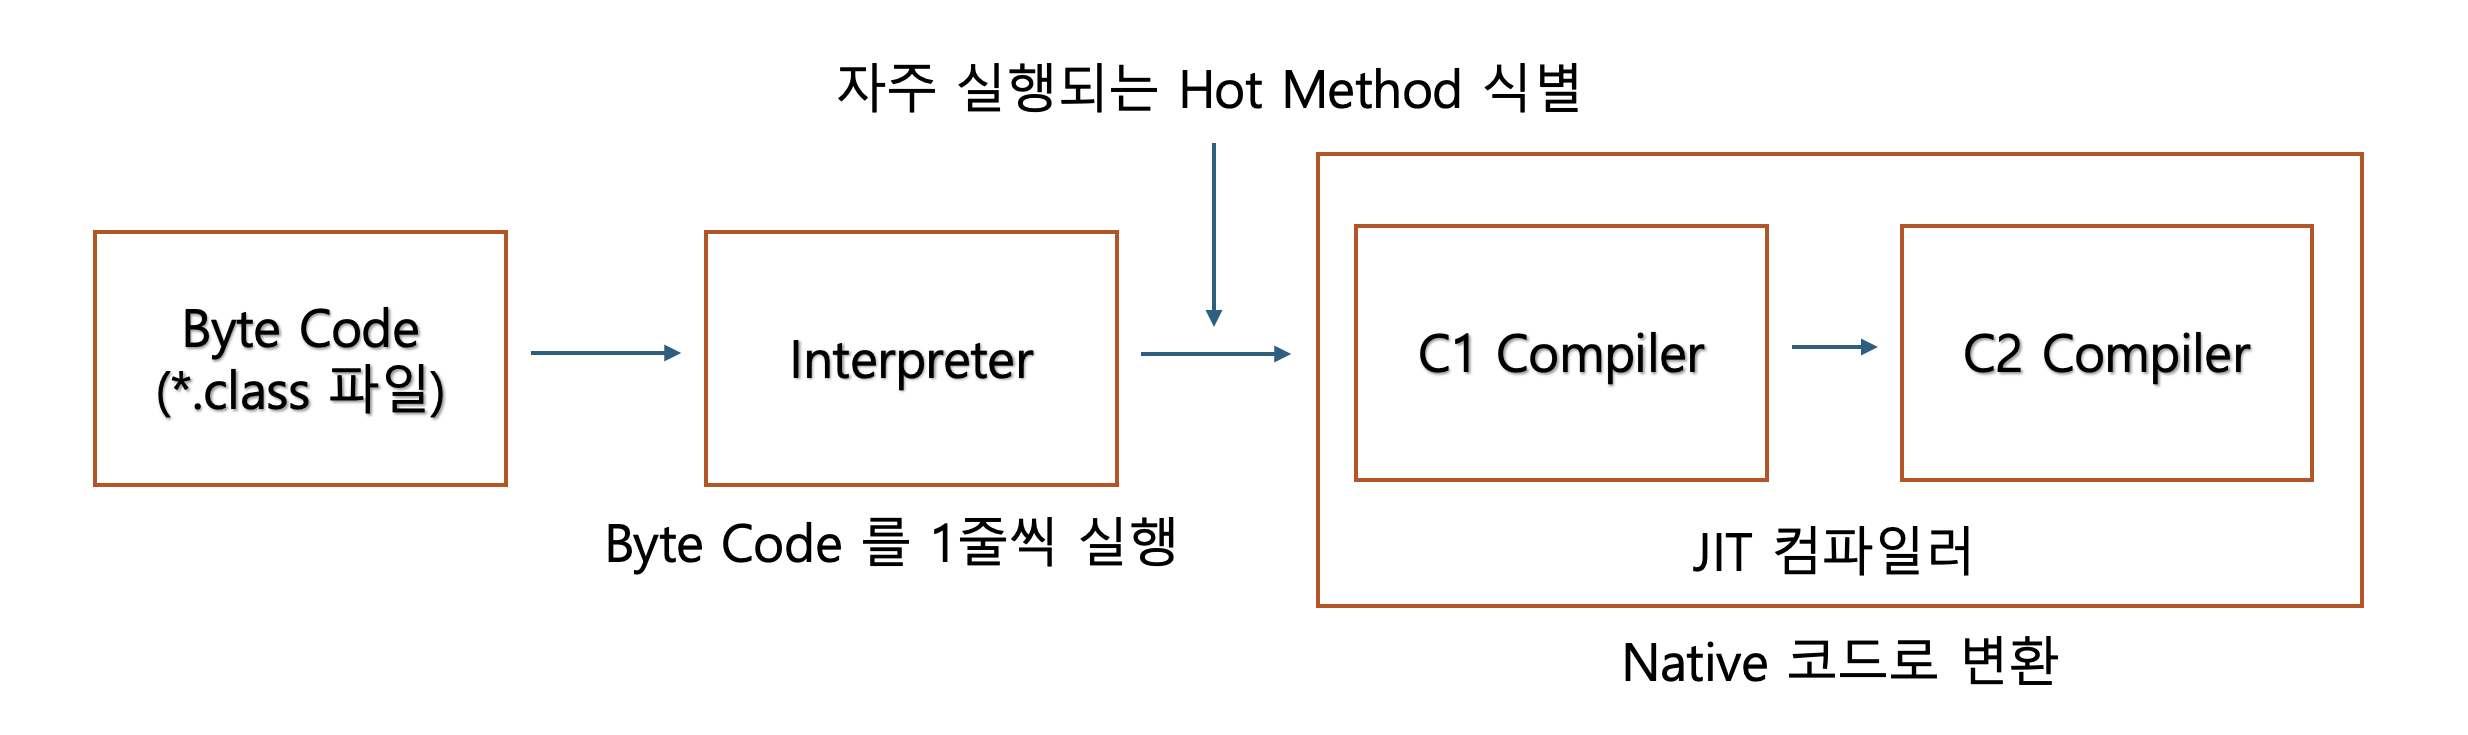
1. JVM 의 JIT (Just-In-Time) 컴파일 Java 애플리케이션은 바이트코드 로 컴파일되어 실행되며, JVM은 런타임에 자주 사용되는 코드를 네이티브 코드 로 최적화합니다.
초기에는 인터프리터 모드 로 실행되어 바이트 코드를 한줄 한줄 해석하기 때문에 성능이 상대적으로 낮습니다. JIT 컴파일러가 자주 실행되는 코드 핫스팟(Hot Spot) 을 식별하고 최적화된 네이티브 코드로 전환됩니다.
때문에 애플리케이션 구동 후 JIT 컴파일러가 핫스팟(Hot Spot) 을 식별하고 최적화하는 전까지는 상대적으로 느릴 수 있습니다.
2. 클래스 로딩 지연 자바 클래스가 프로그램 시작 시 전부 로딩되는 게 아니라 처음 실제로 필요해지는 순간 에 메모리에 로딩 및 초기화되면서 발생하는 지연이 발생합니다.
클래스 로딩은 로딩 > 링킹 > 초기화 순으로 3단계를 거치게 됩니다.
1. 로딩 (Loading) 로딩 단계에서는 클래스 로더가 클래스 파일 .class 을 찾아 바이트코드를 메모리로 읽어옵니다. 로딩 단계에서는 디스크 I/O 가 발생할 수 있어 시간이 더 지연될 수 있습니다.
2. 링킹 (Linking) 링크 단계에서는 바이트코드 검증, 클래스 변수, static 변수 를 위한 메모리 할당 및 기본값으로 초기화,
3. 초기화 (Initialization) 마지막 초기화 단계에서는 정적필드에 실제 값을 세팅합니다.
3. 커넥션 풀 초기화로 인한 지연 애플리케이션은 실행 초기에 minimum-idle 만큼만 커넥션을 생성하는데 이 크기가 작으면 초기에 요청이 몰렸을 시 Connection 이 부족하게 되고 부족한 DB 커넥션을 추가적으로 생성하는 동안 요청에 대한 응답 지연이 발생하게 됩니다.
spring: datasource: hikari: minimum-idle: 10 maximum-pool-size: 20
4. 캐시 웜업
애플리케이션 수준의 캐시(예: Caffeine, EhCache)가 비어있음
첫 요청들은 캐시 미스로 인해 실제 데이터 소스에 접근
캐시가 채워지기까지 성능 저하
Spring Boot에서 Warm Up 방법 1. ApplicationRunner 또는 CommandLineRunner 사용 애플리케이션 시작 후 자동으로 초기화 로직을 실행합니다.
@Component public class WarmUpRunner implements ApplicationRunner { private final UserService userService; private final ProductService productService; public WarmUpRunner (UserService userService, ProductService productService) { this .userService = userService; this .productService = productService; } @Override public void run (ApplicationArguments args) throws Exception { warmUpServices(); preloadCache(); triggerJitCompilation(); } private void warmUpServices () { try { userService.findById(1L ); productService.getPopularProducts(); } catch (Exception e) { log.warn("Warm up failed" , e); } } private void preloadCache () { productService.loadPopularProductsToCache(); } private void triggerJitCompilation () { for (int i = 0 ; i < 10000 ; i++) { productService.someHotMethod(); } } }
2. @PostConstruct를 사용한 Bean 초기화 @Service public class CacheWarmUpService { private final ProductRepository productRepository; private final CacheManager cacheManager; public CacheWarmUpService (ProductRepository productRepository, CacheManager cacheManager) { this .productRepository = productRepository; this .cacheManager = cacheManager; } @PostConstruct public void warmUpCache () { List<Product> popularProducts = productRepository.findPopularProducts(); Cache productCache = cacheManager.getCache("products" ); popularProducts.forEach(product -> productCache.put(product.getId(), product) ); } }
3. 스케줄러를 사용한 주기적 Warm Up @Configuration @EnableScheduling public class ScheduledWarmUp { private final RestTemplate restTemplate; public ScheduledWarmUp (RestTemplate restTemplate) { this .restTemplate = restTemplate; } @Scheduled(initialDelay = 60000, fixedDelay = Long.MAX_VALUE) public void initialWarmUp () { restTemplate.getForObject("http://localhost:8080/actuator/health" , String.class); restTemplate.getForObject("http://localhost:8080/api/products" , String.class); } }
4. HikariCP 커넥션 풀 사전 초기화 spring: datasource: hikari: minimum-idle: 10 maximum-pool-size: 20 initialization-fail-timeout: 0
@Configuration public class DataSourceConfig { @Bean public HikariDataSource dataSource () { HikariConfig config = new HikariConfig (); config.setJdbcUrl("jdbc:mysql://localhost:3306/mydb" ); config.setUsername("user" ); config.setPassword("password" ); config.setMinimumIdle(10 ); config.setMaximumPoolSize(20 ); HikariDataSource dataSource = new HikariDataSource (config); warmUpConnectionPool(dataSource); return dataSource; } private void warmUpConnectionPool (HikariDataSource dataSource) { try (Connection conn = dataSource.getConnection()) { conn.isValid(1 ); } catch (SQLException e) { log.error("Connection pool warm up failed" , e); } } }
5. JVM Warm Up 옵션 JVM 옵션을 통해 시작 시 최적화를 강화할 수 있습니다.
java -XX:+TieredCompilation -jar application.jar java -XX:CompileThreshold=1000 -jar application.jar java -XX:ArchiveClassesAtExit=app.jsa -jar application.jar java -XX:SharedArchiveFile=app.jsa -jar application.jar
Kubernetes에서 Warm Up 방법 Kubernetes 환경에서는 Pod가 준비되기 전에 트래픽을 받지 않도록 하는 것이 중요합니다.
1. Startup Probe 사용 애플리케이션이 시작되었는지 확인합니다. Startup Probe가 성공할 때까지 Liveness와 Readiness Probe는 비활성화됩니다.
apiVersion: apps/v1 kind: Deployment metadata: name: spring-boot-app spec: replicas: 3 template: spec: containers: - name: app image: spring-boot-app:latest ports: - containerPort: 8080 startupProbe: httpGet: path: /actuator/health/liveness port: 8080 initialDelaySeconds: 0 periodSeconds: 5 failureThreshold: 30 readinessProbe: httpGet: path: /actuator/health/readiness port: 8080 initialDelaySeconds: 0 periodSeconds: 5 failureThreshold: 3 livenessProbe: httpGet: path: /actuator/health/liveness port: 8080 initialDelaySeconds: 30 periodSeconds: 10 failureThreshold: 3
2. Readiness Probe와 Custom Health Indicator Spring Boot Actuator를 사용하여 커스텀 헬스 체크를 구현합니다.
@Component public class WarmUpHealthIndicator implements HealthIndicator { private volatile boolean warmedUp = false ; @Override public Health health () { if (warmedUp) { return Health.up() .withDetail("status" , "warmed up" ) .build(); } else { return Health.down() .withDetail("status" , "warming up" ) .build(); } } public void markAsWarmedUp () { this .warmedUp = true ; } } @Component public class WarmUpRunner implements ApplicationRunner { private final WarmUpHealthIndicator warmUpHealthIndicator; private final UserService userService; public WarmUpRunner (WarmUpHealthIndicator warmUpHealthIndicator, UserService userService) { this .warmUpHealthIndicator = warmUpHealthIndicator; this .userService = userService; } @Override public void run (ApplicationArguments args) throws Exception { performWarmUp(); warmUpHealthIndicator.markAsWarmedUp(); } private void performWarmUp () { userService.warmUp(); } }
management: endpoint: health: probes: enabled: true group: readiness: include: warmUp, db, redis
3. PreStop Hook으로 Graceful Shutdown apiVersion: apps/v1 kind: Deployment metadata: name: spring-boot-app spec: template: spec: containers: - name: app image: spring-boot-app:latest lifecycle: preStop: exec: command: ["/bin/sh" , "-c" , "sleep 10" ] terminationGracePeriodSeconds: 30
spring: lifecycle: timeout-per-shutdown-phase: 20s server: shutdown: graceful
4. Init Container로 Warm Up 별도의 Init Container에서 warm up 작업을 수행할 수 있습니다.
apiVersion: apps/v1 kind: Deployment metadata: name: spring-boot-app spec: template: spec: initContainers: - name: warm-up image: spring-boot-app:latest command: ['sh' , '-c' , 'java -cp /app/lib/*:/app/classes com.example.WarmUpTool' ] containers: - name: app image: spring-boot-app:latest
5. HPA(Horizontal Pod Autoscaler)와 함께 사용 apiVersion: autoscaling/v2 kind: HorizontalPodAutoscaler metadata: name: spring-boot-app-hpa spec: scaleTargetRef: apiVersion: apps/v1 kind: Deployment name: spring-boot-app minReplicas: 3 maxReplicas: 10 metrics: - type: Resource resource: name: cpu target: type: Utilization averageUtilization: 70 behavior: scaleDown: stabilizationWindowSeconds: 300 policies: - type: Percent value: 50 periodSeconds: 60 scaleUp: stabilizationWindowSeconds: 0 policies: - type: Percent value: 100 periodSeconds: 30
6. Pod Disruption Budget 설정 Rolling Update 중에도 최소한의 Pod를 유지합니다.
apiVersion: policy/v1
kind: PodDisruptionBudget
metadata:
  name: spring-boot-app-pdb
spec:
  minAvailable: 2
  selector:
    matchLabels:
      app: spring-boot-app
apiVersion: apps/v1 kind: Deployment metadata: name: spring-boot-app spec: replicas: 3 strategy: type: RollingUpdate rollingUpdate: maxSurge: 1 maxUnavailable: 1
실전 Warm Up 전략 종합 예시 @Slf4j @Component @Order(1) public class ComprehensiveWarmUpRunner implements ApplicationRunner { private final DataSource dataSource; private final CacheManager cacheManager; private final RestTemplate restTemplate; private final List<WarmUpTask> warmUpTasks; @Override public void run (ApplicationArguments args) throws Exception { log.info("Starting comprehensive warm-up process..." ); long startTime = System.currentTimeMillis(); warmUpConnectionPool(); warmUpCache(); warmUpHttpClient(); executeCustomWarmUpTasks(); triggerJitCompilation(); long duration = System.currentTimeMillis() - startTime; log.info("Warm-up process completed in {} ms" , duration); } private void warmUpConnectionPool () { try (Connection conn = dataSource.getConnection()) { conn.isValid(1 ); log.info("Database connection pool warmed up" ); } catch (SQLException e) { log.error("Failed to warm up connection pool" , e); } } private void warmUpCache () { warmUpTasks.stream() .filter(task -> task.getType() == WarmUpTaskType.CACHE) .forEach(WarmUpTask::execute); log.info("Cache warmed up" ); } private void warmUpHttpClient () { try { restTemplate.getForObject("http://localhost:8080/actuator/health" , String.class); log.info("HTTP client warmed up" ); } catch (Exception e) { log.warn("Failed to warm up HTTP client" , e); } } private void executeCustomWarmUpTasks () { warmUpTasks.forEach(task -> { try { task.execute(); } catch (Exception e) { log.error("Warm up task failed: {}" , task.getName(), e); } }); } private void triggerJitCompilation () { for (int i = 0 ; i < 1000 ; i++) { } log.info("JIT compilation triggered" ); } } public interface WarmUpTask { void execute () ; String getName () ; WarmUpTaskType getType () ; } public enum WarmUpTaskType { CACHE, SERVICE, CLIENT }
모니터링 및 측정 Warm up 효과를 측정하기 위해 메트릭을 수집합니다.
@Component public class WarmUpMetrics { private final MeterRegistry meterRegistry; public WarmUpMetrics (MeterRegistry meterRegistry) { this .meterRegistry = meterRegistry; } public void recordWarmUpDuration (String taskName, long durationMs) { Timer.builder("warmup.duration" ) .tag("task" , taskName) .register(meterRegistry) .record(durationMs, TimeUnit.MILLISECONDS); } public void incrementWarmUpSuccess (String taskName) { Counter.builder("warmup.success" ) .tag("task" , taskName) .register(meterRegistry) .increment(); } public void incrementWarmUpFailure (String taskName) { Counter.builder("warmup.failure" ) .tag("task" , taskName) .register(meterRegistry) .increment(); } }
결론 Spring Boot 애플리케이션의 Warm Up은 초기 요청 성능을 개선하고 사용자 경험을 향상시키는 중요한 작업입니다. 특히 Kubernetes와 같은 컨테이너 오케스트레이션 환경에서는 Probe 설정과 함께 적절한 Warm Up 전략을 수립하는 것이 필수적입니다.
주요 포인트:
JVM의 JIT 컴파일, 클래스 로딩, 커넥션 풀 등 초기화 비용 고려
ApplicationRunner, @PostConstruct 등을 활용한 자동화된 Warm Up
Kubernetes에서는 Startup/Readiness Probe와 함께 사용
실제 비즈니스 로직에 맞는 커스텀 Warm Up 전략 수립
메트릭 수집을 통한 Warm Up 효과 측정 및 개선
적절한 Warm Up 전략을 통해 애플리케이션의 가용성과 성능을 크게 향상시킬 수 있습니다.